Documentation: Integrating Mimoto Agent with Jamf Pro MDM
Mimoto Continuous Verification on MacOS
Overview
Mimoto adds continuous verification of identity to MacOS systems managed through Jamf Pro. This integration allows admins to configure the installation and configuration of Mimoto on managed MacOS systems.
Overview of configuration steps
From the Mimoto Console, gather the information and data necessary to install the Mimoto Agent via Jamf Pro MDM
From Jamf Pro MDM, setup Mimoto’s information and data so that enrolled systems will be configured with Mimoto’s agent and report back to your Mimoto Console.
From your Mimoto Console, gather your Mimoto agent’s configuration information
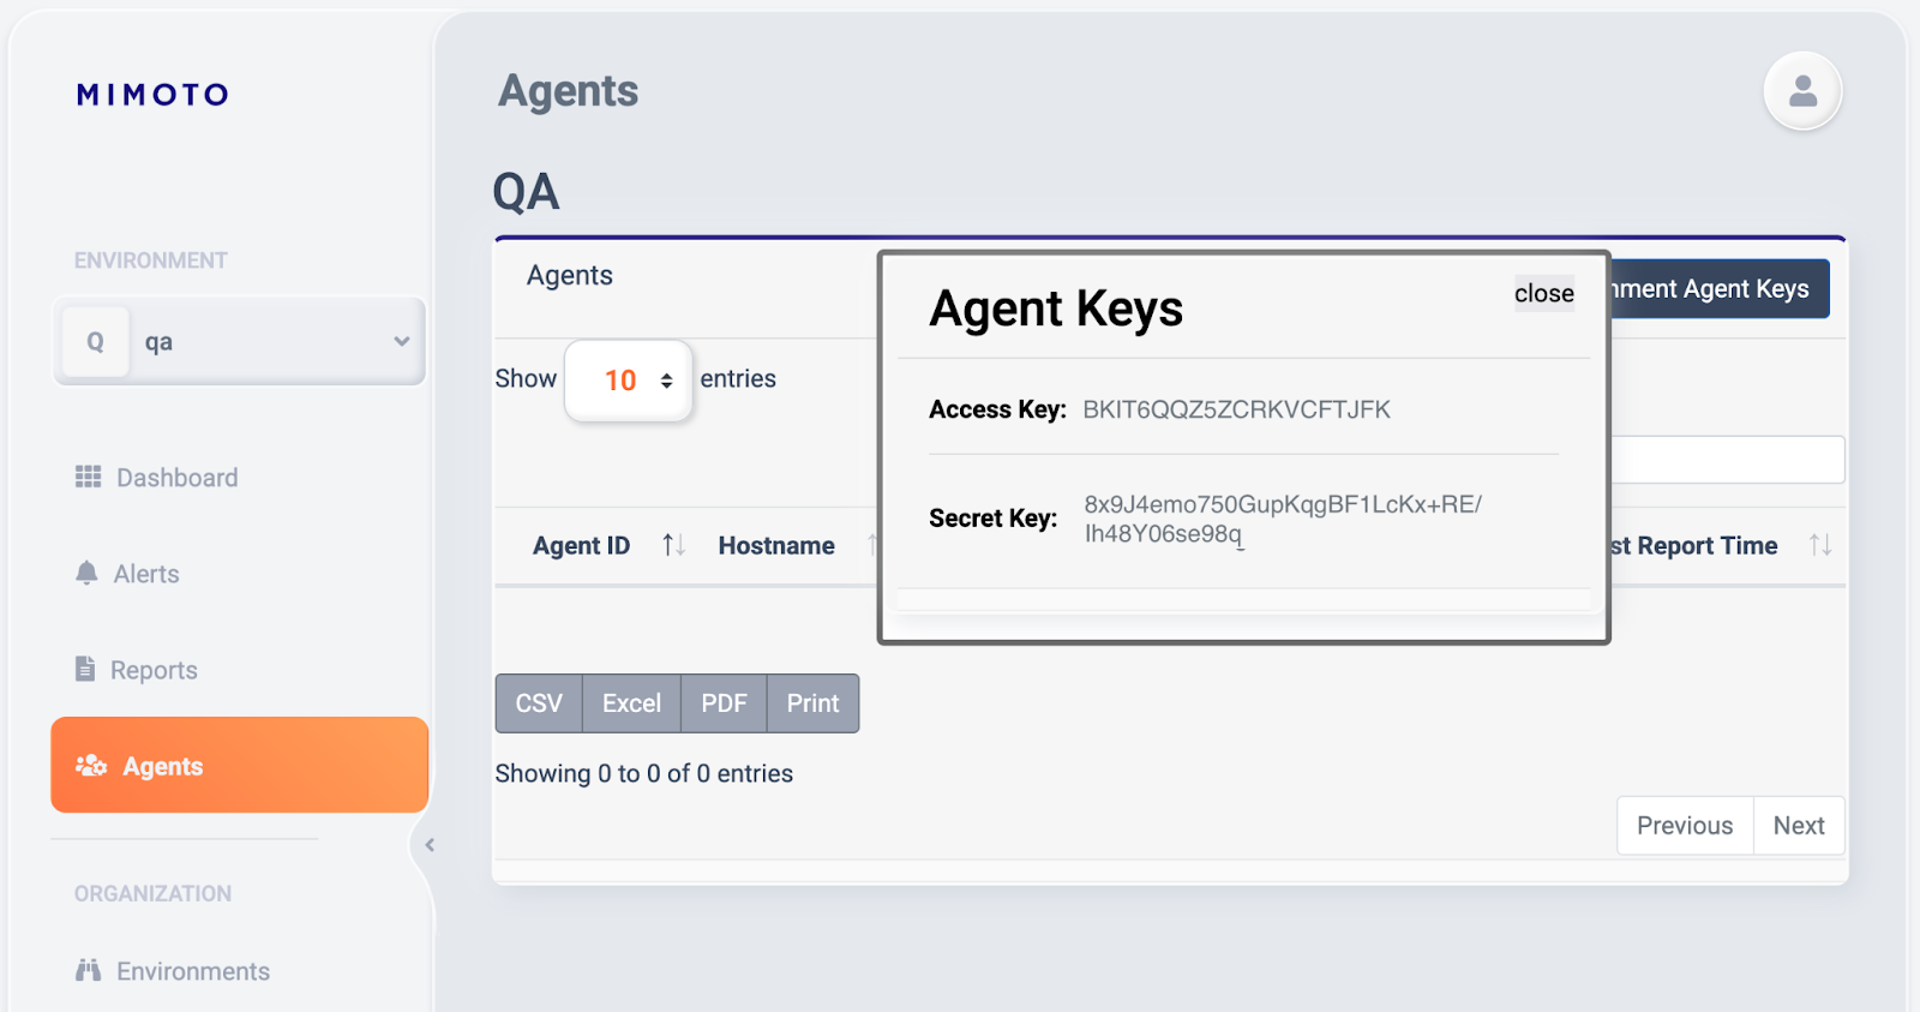
Steps to collect your Mimoto Environment Agent keys
Go to your Mimoto Console, login
Select or create an environment representing a group of systems to deploy mimoto-agent to
Select the Agents tab
Click on the “Environment Agent Keys” button
Copy the “Access Key” and “Secret Key” values to use in a later step
Watch the video walkthrough of how to collect your Mimoto Environment Agent keys:
https://vimeo.com/1158938675/b650008ec8?share=copy&fl=sv&fe=ci
Steps to collect the Mimoto agent binary for distribution
Download the latest Mimoto agent binary with this link
https://mimoto-agent-releases.s3.us-west-1.amazonaws.com/macos/mimoto-agent-mdm-1.1.6-arm64.pkg
Summary
At this moment you gathered 3 piece of information needed to deploy a Mimoto agent via Jamf Pro MDM:
Access Key
Secret Key
Mimoto agent binary
From your Jamf Pro MDM, integrate the Mimoto agent to your deployment steps
Steps to setup the Mimoto agent binary installer for deployment
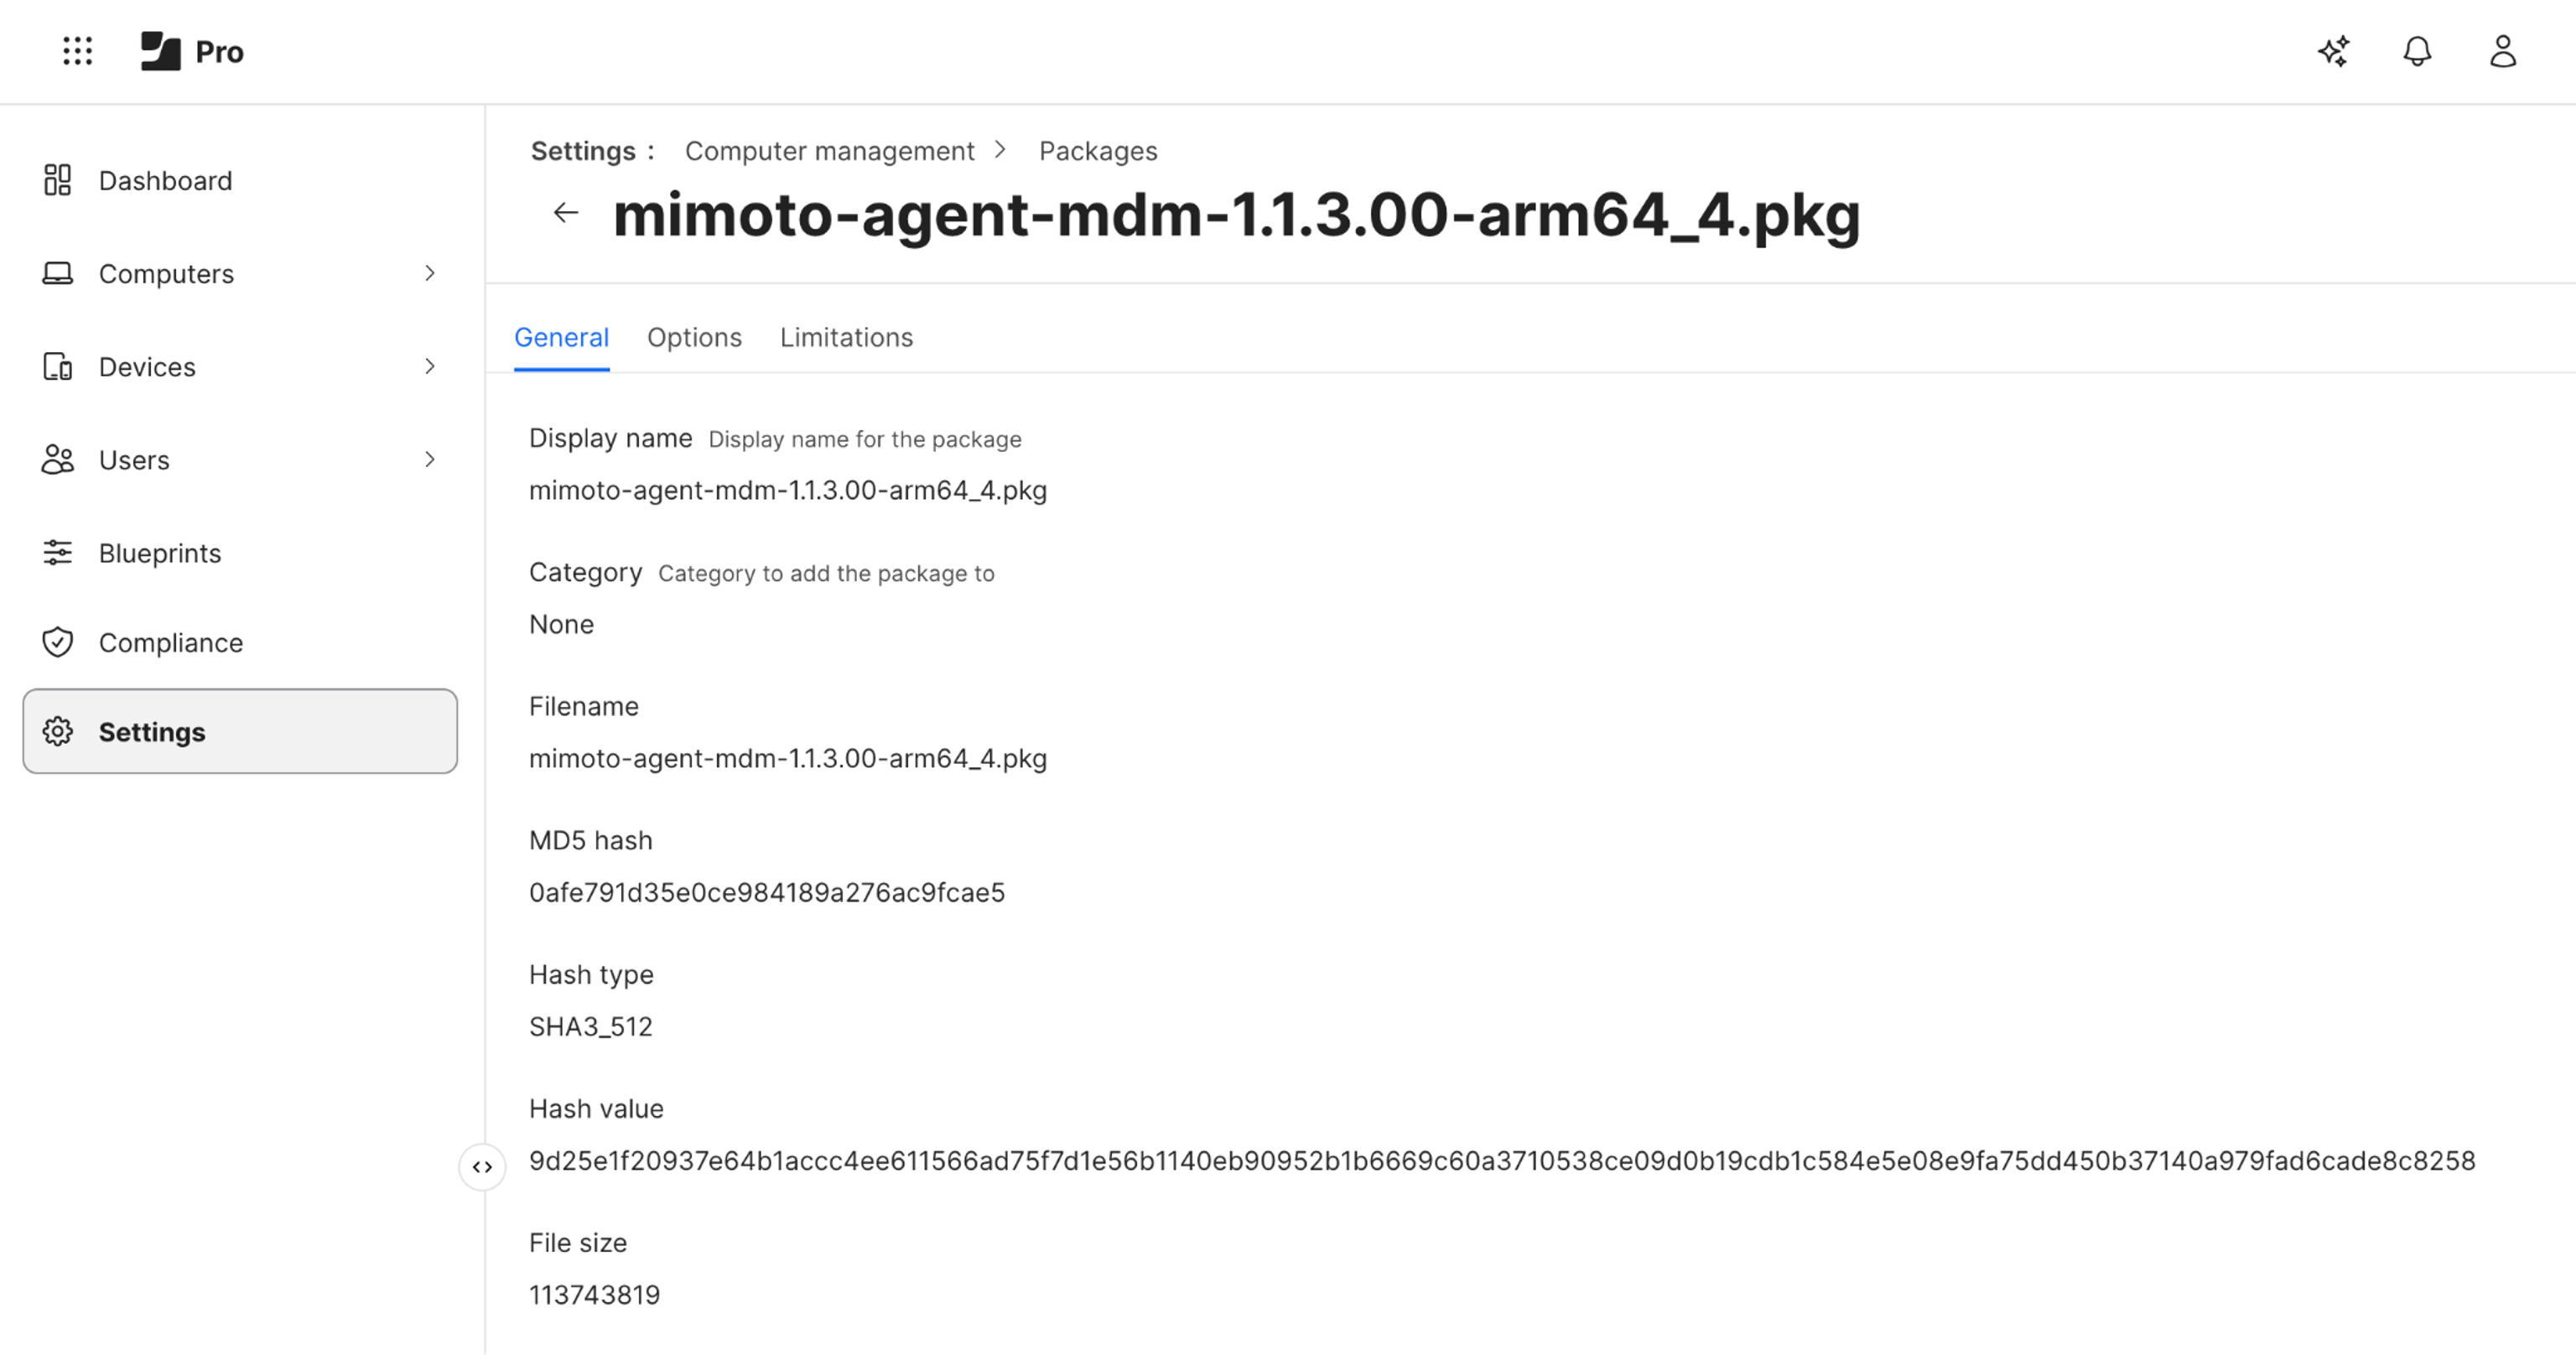
Log in to your Jamf Pro MDM
On the left panel, select Settings, then Computer Management tab
First setting available is Packages, click
On the top right, click the “+ New” button
Fill out information including uploading the installer
Tab General
Add a Display name, and upload the Mimoto agent binary obtained earlierTab Options if any
Tab Limitations if any
Watch the video walkthrough of how to setup the Mimoto agent library binary installer for deployment:
https://vimeo.com/1158938722/cc642c40a1?share=copy&fl=sv&fe=ci
Steps to create a script to finalize installation
Log in to your Jamf Pro MDM
On the left panel, select Settings, then Computer Management tab
Find Scripts, click
On the top right, click the “+ New” button
On the General tab fill the fields required, according to your best practices
On the Script tab, pick Mode “Shell/Bash” and copy/paste the following commands
sudo mkdir /Applications/mimoto-agent.app/profiles
sudo chmod ugo+w /Applications/mimoto-agent.app/profiles
cd /Applications/mimoto-agent.app/
cat > config.json << EOF
{
"policy_bucket": "mimoto-visa-policies"
, "bucket_name": "mimoto-agent-reports"
, "visa_folder": "/Applications/mimoto-agent.app/profiles"
, "log_file": "/tmp/mimoto-agent.log"
, "log_level": 20
, "enable_quirks": true
}
EOF
sudo cp /Library/Managed\ Preferences/ai.mimoto.mimoto-agent.plist /Library/LaunchAgents
sudo defaults import /Library/LaunchAgents/ai.mimoto.mimoto-agent.plist
sudo launchctl bootstrap gui/501 /Library/LaunchAgents/ai.mimoto.mimoto-agent.plist
The tabs Options and Limitations can be filled according to your best practices
Click Save at the bottom right
Steps to setup a Policy so that enrolled computers receive and configure your Mimoto agent
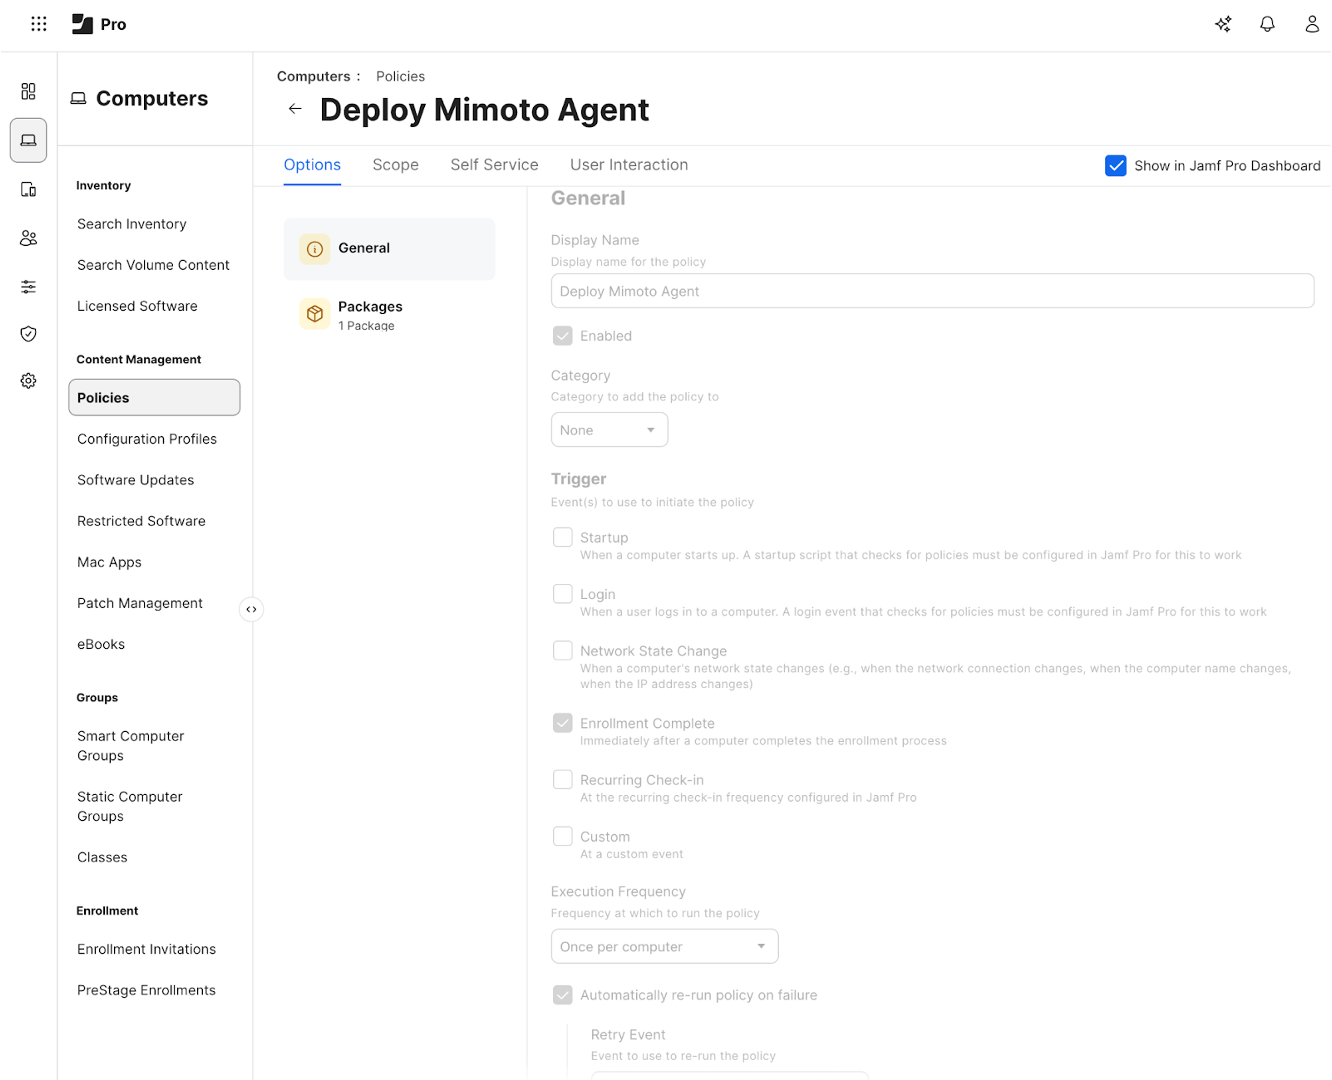
Log in to your Jamf Pro MDM
On the left panel, select Computers
In the next panel, in the Content Management section, click Policies
Create a new Policy by clicking the “+ New” button
You need to configure both the General section and the Packages section
Note: listed here is the minimum set of items to configure, more can be configured depending on your own deployment policies and practicesClick General, you are in the Options tab
Add a “Display Name”
Check Enabled
For the trigger, check “Enrollment Complete” (ie mimoto installation happens right after the enrollment process is completed)
Execution Frequency is “Once per computer” (it does retry if it fails)
If you need manage limitations of date/time, add as needed
Click Scope tab
Switch to the “Scope” tab
Target Computers set to All Computers
Target Users set to All Users
Go back to the Options tab, click Packages from the sub left panel
Configure
Find your package (using version is a good unique identifier in the name), click the Add button on the right
Distribution point is as per your company’s policy, Cloud distribution point is a generic choice
Action is Install
Go back to the Options tab, click Scripts from the sub left panel
Configure
Select the script you created in the above step, click Add
The Priority is After
Other fields can be set according to your policies
Click Save at the bottom right corner
Watch the video walkthrough of how to setup a Policy so that enrolled computers receive and configure your Mimoto agent:
https://vimeo.com/1158938704/8cecb51d07?share=copy&fl=sv&fe=ci
Steps to setup a Configuration Profile for generic Mimoto agent configuration
Log in to your Jamf Pro MDM
On the left panel, select Computers
In the next panel, in the Content Management section, click Configuration Profiles
Create a new Profile by clicking the “+ New” button
Fill out information in the Options tab, General section
For Level, select Computer Level
For Distribution Method, select Install automatically
Back in the Options list, click Applications & Custom Settings
Then select Upload from the options
Click “+ Add”
The Preference Domain must be set to
ai.mimoto.mimoto-agentIn the Property List section, copy the data below:
<?xml version="1.0" encoding="UTF-8"?>
<!DOCTYPE plist PUBLIC "-//Apple//DTD PLIST 1.0//EN" "http://www.apple.com/DTDs/PropertyList-1.0.dtd">
<plist version="1.0">
<dict>
<key>Label</key>
<string>ai.mimoto.mimoto-agent</string>
<key>ProgramArguments</key>
<array>
<string>/Applications/mimoto-agent.app/Contents/MacOS/mimoto-agent</string>
<string>--config</string>
<string>/Applications/mimoto-agent.app/config.json</string>
</array>
<key>RunAtLoad</key>
<true/>
<key>KeepAlive</key>
<true/>
<key>WorkingDirectory</key>
<string>/Applications/mimoto-agent.app/Contents/MacOS</string>
<key>StandardOutPath</key>
<string>/tmp/mimoto-agent-out.log</string>
<key>StandardErrorPath</key>
<string>/tmp/mimoto-agent-err.log</string>
</dict>
</plist>
Fill out the Scope tab as required for your environment
Finally, “Save”
Steps to setup a Configuration Profile for Mimoto organization keys
This is the step where we create a small additional configuration profile that includes the two keys you collected above
Log in to your Jamf Pro MDM
On the left panel, select Computers
In the next panel, in the Content Management section, click Configuration Profiles
Create a new Profile by clicking the “+ New” button
Fill out information in the Options tab, General section
For Level, select Computer Level
For Distribution Method, select Install automatically
Back in the Options list, click Applications & Custom Settings
Then select External Application this time from the options
Click “+ Add”
For Source, select Custom Schema
The Preference Domain must be set to
ai.mimoto.mimoto-agentIn the Custom Schema section, click “+ Add Schema”
And in the pop up, copy the data below, Save:
{"$schema": "http://json-schema.org/draft-07/schema#", "title": "Mimoto Agent Configuration", "description": "Configuration settings for Mimoto Agent managed through Jamf Pro", "type": "object", "properties": {"AWSSettings": {"type": "object", "title": "AWS Configuration", "description": "Amazon Web Services settings for S3 operations", "property_order": 10, "properties": {"BucketName": {"type": "string", "default": "mimoto-agent-reports", "title": "S3 Bucket Name", "description": "Target S3 bucket for agent reports", "property_order": 15, "pattern": "^[a-z0-9][a-z0-9.-]*[a-z0-9]$", "infoText": "S3 bucket name (lowercase letters, numbers, hyphens, and dots)"}, "Region": {"type": "string", "title": "AWS Region", "description": "Configuration for AWS Region"}, "AccessKeyID": {"type": "string", "title": "AWS Access Key ID", "description": "AWS Access Key ID for S3 operations", "property_order": 11, "pattern": "^[A-Z0-9]{16,128}$", "infoText": "AWS access key identifier (16-128 characters)"}, "SecretAccessKey": {"type": "string", "title": "AWS Secret Access Key", "description": "AWS Secret Access Key for S3 operations", "property_order": 12, "format": "password", "pattern": "^[A-Za-z0-9/+=]{16,128}$", "infoText": "Secret key for AWS authentication (16-128 characters)"}, "S3": {"type": "string", "title": "AWSS3", "description": "Configuration for AWSS3"}, "S3Server": {"type": "string", "default": "https://s3-us-west-1.amazonaws.com", "title": "S3 Server URL", "description": "S3 endpoint URL", "property_order": 13, "pattern": "^https?://.*", "format": "uri", "infoText": "Full URL to S3 endpoint including protocol"}, "S3Encryption": {"type": "boolean", "default": true, "title": "Enable S3 Encryption", "description": "Enable server-side encryption for S3 uploads", "property_order": 14}}, "required": ["AccessKeyID", "SecretAccessKey"]}, "DebugSettings": {"type": "object", "title": "Debug Configuration", "description": "Logging and debugging settings", "property_order": 20, "properties": {"LogLevel": {"type": "integer", "default": 20, "title": "Log Level", "description": "Logging verbosity level", "property_order": 21, "enum": [10, 20, 30, 40, 50], "enum_titles": ["DEBUG", "INFO", "WARNING", "ERROR", "CRITICAL"], "infoText": "Controls the verbosity of log output"}, "LogFile": {"type": "string", "title": "Log File Path", "description": "Path to the log file", "property_order": 22, "format": "file-path"}, "LogFileEnabled": {"type": "boolean", "default": false, "title": "Enable File Logging", "description": "Write logs to file", "property_order": 23}, "UseSyslog": {"type": "boolean", "default": false, "title": "Use System Log", "description": "Send logs to system logging facility", "property_order": 24}, "SyslogFacility": {"type": "string", "title": "Syslog Facility", "description": "Syslog facility to use", "property_order": 25, "enum": ["local0", "local1", "local2", "local3", "local4", "local5", "local6", "local7"], "infoText": "macOS syslog facility for log routing"}, "VisaDebugEnabled": {"type": "boolean", "default": false, "title": "Enable Visa Debug", "description": "Enable Visa-specific debugging", "property_order": 27}, "SleepCycle": {"type": "number", "default": 0.25, "title": "Sleep Cycle", "description": "Sleep interval between cycles (seconds)", "property_order": 26, "minimum": 0.1, "maximum": 10.0}}}, "GeneralSettings": {"type": "object", "title": "General Configuration", "description": "General agent behavior settings", "property_order": 30, "properties": {"Interval": {"type": "integer", "default": 30, "title": "Check Interval", "description": "Seconds between agent checks", "property_order": 31, "minimum": 10, "maximum": 3600, "infoText": "How often the agent performs its checks (10-3600 seconds)"}, "EventBufferSize": {"type": "integer", "default": 20, "title": "General Event Buffer Size", "description": "Configuration for General Event Buffer Size"}, "AuthLog": {"type": "string", "default": "/var/log/auth.log", "title": "Authentication Log Path", "description": "Path to authentication log file", "property_order": 32, "format": "file-path"}, "AuthType": {"type": "string", "title": "Authentication Type", "description": "Type of authentication to use", "property_order": 33}, "SessionFinder": {"type": "string", "default": "default", "title": "Session Finder Method", "description": "Method for finding user sessions", "property_order": 34, "enum": ["default", "loginwindow", "console"], "enum_titles": ["Default", "Login Window", "Console"]}, "ProcDir": {"type": "string", "default": "/proc", "title": "General Proc Dir", "description": "Configuration for General Proc Dir"}, "FsdebugDir": {"type": "string", "title": "General Fsdebug Dir", "description": "Configuration for General Fsdebug Dir"}, "PermissionDialogContent": {"type": "string", "title": "General Permission Dialog Content", "description": "Configuration for General Permission Dialog Content"}}}, "VisaSettings": {"type": "object", "title": "Visa Configuration", "description": "Visa-specific settings", "property_order": 40, "properties": {"ID2TimingsFile": {"type": "string", "title": "Visa ID to Timings File", "description": "Path to visa ID to timings mapping file", "property_order": 41, "format": "file-path"}, "ResultKeys": {"type": "array", "title": "Result Keys", "description": "Keys to include in visa results", "property_order": 42}, "Id2timings": {"type": "object", "title": "Visa Id2timings", "description": "Configuration for Visa Id2timings"}, "MinDeltas": {"type": "integer", "default": 20, "title": "Visa Min Deltas", "description": "Configuration for Visa Min Deltas"}, "NumOfRanks": {"type": "integer", "default": 5, "title": "Visa Num Of Ranks", "description": "Configuration for Visa Num Of Ranks"}, "Folder": {"type": "string", "title": "Visa Folder Path", "description": "Directory for visa files", "property_order": 43, "format": "directory-path"}, "UnknownVisa": {"type": "string", "default": "00000000-0000-0000-0000-000000000000", "title": "Visa Unknown Visa", "description": "Configuration for Visa Unknown Visa"}, "PolicyBucket": {"type": "string", "default": "mimoto-visa-policies", "title": "Policy Bucket", "description": "S3 bucket for visa policies", "property_order": 44, "pattern": "^[a-z0-9][a-z0-9.-]*[a-z0-9]$"}, "MwuBufferSize": {"type": "integer", "default": 600, "title": "Visa Mwu Buffer Size", "description": "Configuration for Visa Mwu Buffer Size"}, "UpdateModel": {"type": "boolean", "default": true, "title": "Visa Update Model", "description": "Configuration for Visa Update Model"}, "EnableModelCaching": {"type": "boolean", "default": true, "title": "Visa Enable Model Caching", "description": "Configuration for Visa Enable Model Caching"}, "AgentManifestFileName": {"type": "string", "default": "mimoto-agent-manifest.json", "title": "Visa Agent Manifest File Name", "description": "Configuration for Visa Agent Manifest File Name"}, "DefaultModelName": {"type": "string", "default": "model.joblib", "title": "Visa Default Model Name", "description": "Configuration for Visa Default Model Name"}, "DefaultHostName": {"type": "string", "default": "*", "title": "Visa Default Host Name", "description": "Configuration for Visa Default Host Name"}, "MultiuserModelDirName": {"type": "string", "default": "model_multi_users", "title": "Visa Multiuser Model Dir Name", "description": "Configuration for Visa Multiuser Model Dir Name"}, "MultiuserModelDefaultProfileName": {"type": "string", "default": "default-multi-users", "title": "Visa Multiuser Model Default Profile Name", "description": "Configuration for Visa Multiuser Model Default Profile Name"}}}}, "additionalProperties": false, "required": ["AWSSettings"], "__comment": "Deploy to macOS preference domain: ai.mimoto.mimoto-agent"}
Using the Form Editor view insert your 2 keys in the field labeled:
AWS Access Key ID
AWS Secret Acces Key
Fill out the Scope tab as required for your environment
Finally, “Save”
Watch the video walkthrough of how to setup a Configuration Profile:
https://vimeo.com/1158938691/562c4bfefc?share=copy&fl=sv&fe=ci
Summary
Your Jamf Pro MDM has:
A Policy that contains the Mimoto agent binary to deploy along with additional automated steps in a script
A Configuration Profile, for the common mimoto-agent configuration
A second Configuration Profile, for your specific Mimoto organization Access Key and Secret Key so that the agent can report back to your Mimoto Console Environment
References
Jamf Pro Policies (Jamf Pro Policy documentation)
Policy configuration (Jamf Pro Policy deployment documentation)